
Introduction -A South Indian Classic Reimagined
Karuveppillai rice or curry leaf rice is an outstanding South Indian dish that is incredibly nutritious, serving the purpose of every mouthful. Among all the healthy dishes with such an attractive earthy fragrance, people have long utilized them to nourish a diet. This helps in quicker preparation, so one can place them in the list of items served in a lunchbox and easily prepare for meal times. Let’s see the rich history behind it, incredible health benefits, and a step-by-step guide to preparing it.
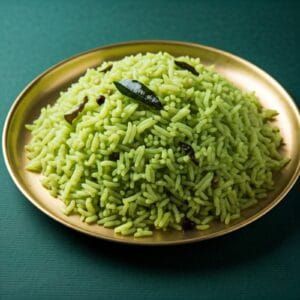
What is Karuveppilai Rice?
Karuveppilai rice is a delicious preparation of rice made mainly with the use of curry leaves, commonly known as “karuveppilai” in the Tamil language which is spoken mainly in Tamil Nadu and parts of South India. The dish involves sautéing curry leaves along with some spices such as mustard seeds, urad dal (black gram split peas), and dried red chilies and mixing the spices in cooked rice. The result is a fragrant, slightly spicy rice dish that is both light and satisfying.
Curry leaves are an essential ingredient in most South Indian dishes. They give an earthy and citrusy flavor to the rice, making it an interesting dish to enjoy either alone or with curries and dals.
Ingredients Needed for Karuveppilai Rice
The beauty of Karuveppilai rice is that it uses simple ingredients that are easy to find in most kitchens, especially if you are familiar with South Indian cooking. Here are the basic ingredients needed to prepare this dish:
Main Ingredients:
- Rice – Any sort of rice is okay; however, preferably basmati rice or even sona masoori rice for Indian dishes.
- Fresh curry leaves – You will need fresh curry leaves. Actually, this is the star ingredient of the recipe. Fresh curry leaves are preferred, but dried curry leaves can be used as a substitute if you do not have them.
- Salt – To season the rice to taste..
For Tempering (Tadka or Seasoning):
- Oil – You can use any oil of your choice; however, coconut oil or sesame oil is generally used to add an authentic flavor of South Indian
- Mustard seeds – Mustard seeds add some crunch and a touch of tanginess.
- Urad dal – These small black lentils give a mild crunch to the dish.
- Chana dal (Bengal gram) – Another variety of lentils that helps in giving a nice texture and flavor.
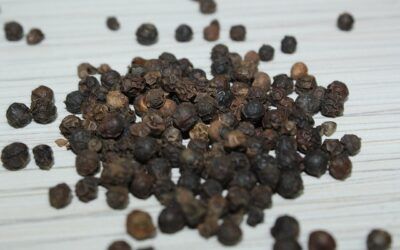
- Dried red chilies –For spice. Use as many or as few dried chilies as you can handle.
- Hing (asafoetida) – A pinch of hing imparts a very strong, pungent smell and aids in digestion.
Optional Add-ins:
- Grated coconut – Fresh grated coconut adds a creamy texture and a subtle sweetness to the rice.
- Peanuts or cashews – For added crunch and a nutty flavor.
- Lemon juice – Adds a tangy finish to the dish, enhancing its flavor.#
How to Make: Step-by-Step Guide
Preparation of Karuveppilai rice is pretty easy and quite a direct method. Very few steps are necessary for this yummie preparation. So here is the easy stepwise procedure by which anyone can make it at home also:
Step 1: Cook the Rice
Rice should first be boiled.
If that leftover rice remains unused, then it’s an excellent opportunity to do it. If not possible, fresh can be boiled through a rice cooker, pressure cooker, or simply any ordinary pot. Let that boiled rice cool so it would not be too sticky
Step 2: Prepare the Tempering
Heat some oil – coconut oil or sesame oil, preferably – over medium heat in a large pan. When hot, add mustard seeds. Once they pop (when they will have released all their flavor to the oil).
Pour in the urad dal and chana dal. Stir-fry them till they are golden brown. This gives a very slight crunch and nutty flavor to the dish.
Step 3: Add the Curry Leaves and Spices
Now it is the time to add fresh curry leaves into the pan. Fry them for a few minutes until they get crispy and fragrance comes out from them. Add dried red chilies and a pinch of hing (asafoetida) at this stage. Stir well to mix all the ingredients..
Step 4: Mix in the Rice
When the tempering is prepared, the cooked rice must be added to the pan and then must be mixed gently in the spices. In other words, the seasoning must now well coat the rice.
Step 5: Garnish and Serve
Finally, garnish the Karuveppilai rice with your choice of optional add-ins. You can go for roasted peanuts, cashews, or even grated coconut, and you’re done. Finally, squeeze a bit of fresh lemon juice to give it that tangy bite. Serve this warm rice over your favorite curry, dal, or yogurt.
Tips for Perfect Karuveppilai Rice
To make sure your Karuveppilai rice is completely perfectly prepared, here are some useful tips:
- Use Fresh Curry Leaves: Fresh curry leaves are the main item in this recipe. If possible, buy fresh curry leaves from an Indian grocery store or your local farmers’ market for the best flavor.
- Don’t Overcook the Rice: The rice must be cooked thoroughly but not too much. When the rice is overcooked, the dish becomes mushy.
- Customize the Spice Level: Adjust the spice level by adding or reducing the number of dried red chilies according to your preference. If you like less spicy, remove the seeds from the chilies before adding.
- Add Crunch with Nuts: Roasting peanuts or cashews and adding them to the rice will give the dish extra texture and flavor.
Health Benefits of Karuveppilai Rice
The recipe of Karuveppilai rice not only tastes good but also can cater to the health needs of the people who consume it. There are several health benefits of Karuveppilai rice, described as follows
- Rich in Antioxidants: Curry leaves contain antioxidants. Antioxidants in curry leaves protect the human body from free radicals that cause much illness and make the skin healthy.
- Good for Digestion: Along with the mustard seeds and hing, curry leaves help in digesting food so that there won’t be a problem of indigestion or bloating.
- Boosts Immunity: The spices used in Karuveppilai rice, such as mustard seeds and curry leaves, have been known to have immune-boosting properties.
- Supports Healthy Hair: Curry leaves are known to promote healthy hair growth and prevent hair loss because of their high levels of vitamins and minerals.
Variations of Karuveppilai Rice
While the basic recipe for Karuveppilai rice is delicious on its own, you can make fun variations by adding other ingredients. Here are a few ideas:
1. Coconut Karuveppilai Rice
For a creamier flavor and a richer flavor, add some grated fresh coconut to the rice while mixing it with the tempering. Coconut adds a kind of sweetness, which balances well with spices.
2. Vegetable Karuveppilai Rice
Add some vegetables like peas, carrots, or green beans in the rice, and this makes the dish much more nutritious by adding color. This variation of the dish will make it quite filling.
3. Lemon Karuveppilai Rice
Stir the rice and just before serving time, squeeze over fresh lemon juice. The acidic taste of lemon juice complements the curry leaf flavor and other spices, enhancing the refreshing touch on it.
When to Enjoy Karuveppilai Rice
This dish can be had at any time of the day. Here are a few occasions when you may want to have this flavorful dish:
- For Lunch or Dinner: Karuveppilai rice is a perfect meal when served as it is, or with some curry, dal, or even with yogurt.
- For Picnics or Travel: This dish travels well and serves well at room temperature, perfect for a picnic or travel meal.
- For Special Occasions: As a side dish for a South Indian meal, Karuveppilai rice is an excellent addition to the menu
Conclusion: Try Karuveppilai Rice Today!
Simple to make but simply incredible in its flavour, the humble curry leaf karuveppilai rice lets this earthy note of the leaves take over centre stage. Full of healthy value and destined for a special spot in your favourite dishes list. Enjoy as an accompaniment, or by itself, as its flavour alone ensures it makes that special list you keep with a few secret desires.
So, why not give it a try? The next time you’re in the kitchen, whip up some Karuveppilai rice and experience the delicious flavors of South India!
Share Your Thoughts!
Have you tried Karuveppilai rice before, or are you planning to try it now? Let us know how it turned out, or share your favorite variations of the dish in the comments below! Happy cooking!

0 Comments